Digit Recognition with LatticaAI Demo Tutorial
Overview of the Model
Our Digit recognition model is trained on the MNIST dataset. This dataset is a collection of grayscale images of handwritten digits (0–9), each 28×28 pixels in size. We added some preprocessing and data augmentations to the training data, for better performance on real world sketches of handwritten digits.
The model architecture is FCNN (fully-connected neural network):
- Input Layer: flattens the 28x28 image into a 784-dimensional vector.
- Hidden Layer: a fully connected layer with 50 neurons and square activation.
- Output Layer: a fully connected layer with 10 neurons (one for each digit) and a softmax activation.
The reason we chose to use square activation instead of the popular ReLU activation, is that homomorphic operation are better suited for polynomial operators, and square is the simplest and lowest degree non-linear operator that we can use as layer activation.
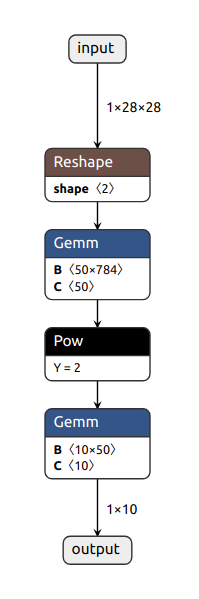
Here is a sample code for inferring digit from an image using the trained model:
digits_recognizer.pthdigit.png
import torch
import matplotlib.pyplot as plt

def inference(l1_weight, l1_bias, l2_weight, l2_bias, x):
    x = x.flatten()
    x = l1_weight @ x + l1_bias
    x = x ** 2
    x = l2_weight @ x + l2_bias
    return torch.nn.functional.softmax(x, dim=0)

# load model weights
model_dict = torch.load("digits_recognizer.pth", map_location="cpu")

# digit inference
img = plt.imread("digit.png")[..., 0]
pt = torch.tensor(img).unsqueeze(0)

res = inference(
    model_dict["fc1.weight"], model_dict["fc1.bias"],
    model_dict["fc2.weight"], model_dict["fc2.bias"],
    pt,
)

plt.figure()
plt.imshow(img)
plt.title(f"Prediction: {res.argmax().item()}")
plt.axis("off")

plt.show()
Achieving Full Privacy with LatticaAI
First install our client package
- 🧊 Python SDK
- 📦 TypeScript SDK
import os

import torch
import matplotlib.pyplot as plt

from lattica_query import QueryClient, QueryToken

# Set LATTICA_QUERY_TOKEN to a query token scoped to this demo model.
token = QueryToken(os.environ["LATTICA_QUERY_TOKEN"])
img = plt.imread("digit.png")[..., 0]
pt = torch.tensor(img).unsqueeze(0)

with QueryClient(token) as client:
    key = client.keys.ensure()
    # `res` is a torch.Tensor, as in the plain example above.
    res = client.query.encrypted(pt, key=key)

# Display the image and prediction as above...
import {
  getDemoToken,
  imageToTensor,
  initWasm,
  LatticaQueryClient,
} from '@lattica-ai/query';

initWasm();

const modelId = 'sketchToNumber';
const token = await getDemoToken(modelId);
const client = new LatticaQueryClient(token);

// Generate the keys and register the evaluation key.
await client.init();

// imageDataUrl contains the 28 × 28 grayscale image.
const pt = await imageToTensor(imageDataUrl, true, true);
const encryptedInput = await client.encrypt(pt);
const encryptedResult = await client.apply_query(encryptedInput);
const result = await client.decrypt(encryptedResult);
See our step-by-step guide for a detailed explanation of each step in this flow.
To use the digit recognition model, use the sketchToNumber model ID.